Environmental Core 3 Wiki
This mod contains all of the essential resources and crafting mechanics for the Environmental series of mods. It contains Multiblock Components, Crystals, Interconnects, Machines and various other common crafting materials.
Authors: ValkyrieofNight
Crystals and Mica
Litherite
The first crystal, Litherite, can easily be obtained by combining emeralds, ender pearls and quartz. This recipe is just a regular crafting recipe and can be viewed in JEI. There are several recipes associated with crafting litherite and you'll most likely want to aim for the one that uses 4 ender pearls, and 4 quartz in order to get the most out of your emeralds.
Eriodium, Kyronite, Pladium, Ionite and Aethium
All of these crystals have the same method to obtain them and that is through the Crystal Miner program in the Void Miner. In order to get the next tier of crystal though you will need to have the previous tier miner to mine them with.
Nanorite and Xerothium
These two crystals are obtained in the same way as the crystals above(through mining in the void Miner) the one exception being that your miner needs to be located in the End dimension.
You can however, mine these crystals in any dimension that you want but it will require you to craft an Interdimensional Modifier and replace one of your modifiers on your miner with it.
Mica
You can obtain mica using the Resource Miner(Multi Miners->Resource Miner) or the Rocky Resource Miner(Resource Miners->Rocky Resource) programs. Mica does not have a lens focus which means there is no lens type that will improve its mining rates. The best way to obtain it is using the Rocky Resource Miner program.
Assembler
In this chapter you will find information on the Assembler and how to add new recipes to it using Datapacks. The Assembler is one of the core crafting mechanics used to craft widely used components and Blocks.
Assembler
The Assembler is used to craft and upgrade many items and blocks in the Environmental Mods. It is also one of the first machines you will need to craft in order to progress in any of the Environmental Mods.
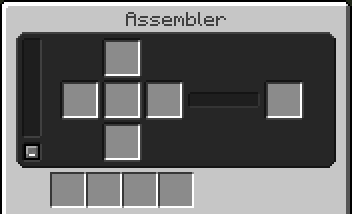
Crafting Slots
In the Assembler the order in which each slot is populated is: top, bottom, left, right, center.
Modifiers/Speeding up the Assembler
The Assembler is pretty slow by default but you can make it a lot faster by using Frequency Modifiers(Yes the same ones you put in your Void Miner). Using the bottom 4 slots in the GUI you can have up to 16 modifiers installed at a time.
Automating
It is pretty simple to automate the Assembler. The button in the bottom left of the GUI switches the input slots between accepting 64 items or 1 item per slot. Make sure this is set to 1 item per slot if you intend on only crafting 1 thing at a time.
If you are using Refined Storage its best to use its JEI + button to create the recipes as it puts the input items in the right insertion order in the pattern.
Creating Assembler Recipes
In this article we will look into how to make recipes for the Assembler using json based datapacks. The folder location for your recipes would be in data/NAMESPACE_HERE/envirocore/assembler/the NAMESPACE_HERE can be replaced with your datapack/mods id.
Lets make a recipe.
This is the base recipe structure for an Assembler recipe. "top", "bottom", "left", "right" and "center" are all input slots and "output" is obviously the output slot for the recipe. The "duration" is how long the recipe takes to craft in ticks. Keep in mind that this is the base recipe time and can be faster if Frequency Modifiers are used inside the Assemblers modifier slots.
{
  "duration": {
    "raw:int": 100
  },
  "top": {

  },
  "bottom": {

  },
  "left": {

  },
  "right": {

  },
  "center": {

  },
  "output": {

  }
}
Each input can accept a variety of types including Items, Items with NBT, and Item Tags. You can find all possible input types in this article: Recipe Item Types
Merging Center Slot NBT
In assembler recipes the "center" slot can have its nbt merged with the output Item. To do that you will need to have the following in the base recipe itself (not in any of the slots)
"merge_center_nbt": trueOverriding Recipes
If you want to disable or replace any of the recipes for the Assembler you can follow This Tutorial
Memory Programmer
This chapter contains information about the Memory Programmer and also how to add new recipes using Datapacks.
Memory Programmer
The Memory Programmer is a machine that uses energy to program Flash Memory. For example you can program various Void Miner programs onto them in order to make your Void Miner mine different items.
The Interface and Programming
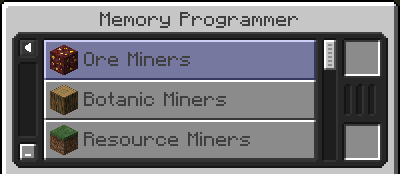 By default the interface displays Categories of programs and you'll need to select a category before selecting a program. If you need to go back to the Category selection screen you can press the arrow button in the top left of the GUI.
Before you start programming your Flash Memory in the Memory Programmer you will need to supply it with some energy.
To program flash memory all you do is place a Flash Memory Item in the top right slot of the interface and then select a program you want to program to it. Once you have selected a program the Memory Programmer will program the selected program to the Flash Memory and then transfer it to the bottom right slot inside the Interface. Once your Memory is in the bottom slot it is ready to take out and use. Flash Memory can be written over which means you can use your previously programmed memory to add a new program too.
Creating Memory Programmer Recipes and Categories
In this article we will look into how to make Memory Programmer Categories and Program recipes.
Memory Programmer Categories
Folder Location: data/NAMESPACE_HERE/envirocore/memory_programmer_category/
This is a base blank category without item Icons:
{}Yup that's right, all you need is an empty json file for the base category although you will need to add Localizations to the category id using some sort of resource loader or resource pack. Below is what you'd need to add to your lang file to add a localization to the category:
"memory_programmer_category.NAPESPACE_HERE.NAME_OF_CATEGORY_JSON_HERE": "NAME OF CATEGORY HERE"Category Icons
You can add item icons to your Category too, below is an example of a Memory Programmer Category with icons:
{
  "icons":[
    {"raw:item": "minecraft:diamond_ore"},
    {"raw:item": "minecraft:gold_ore"}
  ]
}
Memory Programmer Recipes
Folder Location: data/NAMESPACE_HERE/envirocore/memory_programmer/
This is the base Memory Programmer recipe.
{
  "categories": [],
  "program": "",
  "r": 255, "g": 255, "b": 255,
  "input": {
  },
  "output": {
  },
  "duration": {"raw:int": 40}
}
Categories
Setting which categories this shows up under is pretty simple all you have to do is get your category id which would be "NAMESPACE_HERE:MEMORY_PROGRAMMER_CATEGORY_JSON_FILE_NAME_HERE"So for example if you wanted to add your recipe to both your own category and one from environmental tech you could do the following:
"categories": [
  "NAMESPACE_HERE:MEMORY_PROGRAMMER_JSON_FILE_NAME_HERE",
  "envirotech:ores"
]
Program ID
The program id would be for example the id of the void miner program.
"program": "envirotech:crystal"Flash Memory RGB
The R, G and B values are for the color that the memory will show up as after programmed. Each value can be between the values of 0 and 255.
Input and Output
The syntax for input and output items can be found in: Recipe Item Types
You will most likely want to just use the Flash Memory item that is in envirocore so the format for that would be:
"raw:item": "envirocore:flash_memory"Overriding Recipes
If you want to disable or replace any of the recipes for the Assembler you can follow This Tutorial
Lens Grinder
This chapter contains information about the Lens Grinder and how to add new recipes using Datapacks.
Lens Grinder
The Lens Grinder is a machine that uses Energy to create Lenses. For example you can create Crystal Lenses by placing a block of the corresponding crystal into the Lens Grinder and selecting the Lens recipe associated with that lens.
The Interface and Grinding Lenses

By default the interface displays Categories of Lenses and you'll need to select a category before selecting a program. If you need to go back to the Cateogory selection screen you can press the arrow button in the top left of the GUI.
Before you start grinding lenses you will need to supply it with some energy.
To grind a lens all you need to do is place a regular Lens or a Crystal of the corresponding Crystal Lens that you want to craft and then select the crystal lens type you want to craft.
Creating Lens Grinder Recipes and Categories
In this article we will look into how to make Lens Grinder Categories and Lens recipes.
Lens Grinder Categories
Folder Location: data/NAMESPACE_HERE/envirocore/lens_grinder_category/
This is a base blank category without item Icons:
{}Yup that's right, all you need is an empty json file for the base category although you will need to add Localizations to the category id using some sort of resource loader or resource pack. Below is what you'd need to add to your lang file to add a localization to the category:
"lens_grinder_category.NAPESPACE_HERE.CATEGORY_JSON_FILE_NAME": "NAME OF CATEGORY HERE"Category Icons
You can add item icons to your Category too, below is an example of a Lens Grinder Category with icons:
{
  "icons":[
    {"raw:item": "minecraft:diamond_ore"},
    {"raw:item": "minecraft:gold_ore"}
  ]
}
Lens Grinder Recipes
Folder Location: data/NAMESPACE_HERE/envirocore/lens_grinder/
This is the base Lens Grinder recipe.
{
  "categories": [],
  "focus": "",
  "r": 255, "g": 255, "b": 255,
  "input": {
  },
  "output": {
  },
  "duration": {"raw:int": 40}
}
Categories
Setting which categories this shows up under is pretty simple all you have to do is get your category id which would be "NAMESPACE_HERE:LENS_GRINDER_CATEGORY_JSON_FILE_NAME_HERE"So for example if you wanted to add your recipe to both your own category and one from environmental tech you could do the following:
"categories": [
  "NAMESPACE_HERE:LENS_GRINDER_JSON_FILE_NAME_HERE",
  "envirotech:colored"
]
Focus ID
The program id would be for example the id of the void miner focus id.
"focus": "envirotech:white"Lens RGB
The R, G and B values are for the color that the Lens will be after crafted. Each value can be between the values of 0 and 255.
Input and Output
The syntax for input and output items can be found in: Recipe Item Types
You will most likely want to just use the Lens or Crystal Lens that is in envirocore so the format for that would be:
"raw:item": "envirocore:lens"or
"raw:item": "envirocore:crystal_lens"Overriding Recipes
If you want to disable or replace any of the recipes for the Assembler you can follow This Tutorial